How to Install Google Camera (GCam Mod) on Redmi Note 9 Pro - TechPP


How to Install Google Camera (GCam Mod) on Redmi Note 9 Pro


In our review of the Redmi Note 9 Pro, we found that the rear cameras, while good in bright lighting conditions, performed inconsistently in low light. Few images tuned out to be very soft while the rest were over-sharpened. The 48-megapixel Samsung GM2 primary sensor is surely better than the GM1 which we saw on the Redmi Note 8 Pro.


how to install google camera (gcam mod) on redmi note 9 pro - redmi note 9 pro gcam mod


Well, Google Camera or what we commonly refer to as GCam mod is here to fix that. Needless to say, results with GCam are much better than the stock camera app especially with Night Sight and portrait selfies, so let’s see how you too can install the GCam mod on your Redmi Note 9 Pro to take better quality pictures.


Do remember this is a community mod and work-in-progress. It can be buggy at times but if you are a fan of Google Pixel’s image processing, you won’t mind it at all. Let’s get started with the download and installation of Google camera apk for Redmi Note 9 Pro.


How to Install Google Camera on Redmi Note 9 Pro


  • Download the required APK file from this link and install it by allowing installation from other sources if you haven’t done it already. This build of G Cam does not require a dedicated config file.

  • Once installed, fire up the app and head over to the settings menu and scroll down to the “photo” section and tap on “Advanced”.

  • Under the “Advanced” menu, disable “use astrophotography mode” (this can be enabled when you want to shoot with a tripod). Then, go to “Saturation” and for both the back camera and front camera, change “Highlight Saturation” to 2.1 and “Shadow Saturation” to 2.7.

  • Close the app and reopen it and you should be good to go!


Redmi Note 9 Pro Google Camera Tips


Thanks to Google Camera 7.3 on Redmi Note 9 Pro, you get features like 24fps video recording, astrophotography mode and Top Shot photos. As is the case with most Gcam mods, only the primary camera is active on the Google camera app. If you wish to switch to wide-angle lens of telephoto lens, go to Settings -> Advanced -> Auxiliary camera and toggle on the Show buttons. Indeed it’s cumbersome, but the quality of Google Camera makes it worth the effort.


Redmi Note 9 Pro Google Camera Mod Samples

Here are some comparison shots that were taken from the stock camera app and GCam where you can see a noticeable difference especially in low light as well as with edge detection on selfie portraits. This G Cam mod for Redmi Note 9 Pro has support for astrophotography also, but keep it disabled unless you have a tripod or else you will not be able to use Night Sight. If you have any other questions, feel free to tweet it to us at @TechPP.

how to install google camera (gcam mod) on redmi note 9 pro - redmi note 9 pro gcam 1

how to install google camera (gcam mod) on redmi note 9 pro - redmi note 9 pro gcam 2

how to install google camera (gcam mod) on redmi note 9 pro - redmi note 9 pro gcam 3

how to install google camera (gcam mod) on redmi note 9 pro - redmi note 9 pro gcam 4

Also, we will update this post as and when there are newer versions of GCam available for the Redmi Note 9 Pro so watch out for that.

Was this article helpful?

YesNo


Readmore : Android Apps Every User Should Have


Source: techpp.com

Get this app to check out Android 12's wallpaper-based themes on any phone right now


Android introduced a proper system-wide dark mode back in 2019, but many app developers still haven't come around implementing proper dark themes for their apps — even Google didn't update Google Maps until earlier this year. That's where a neat app from a third-party developer comes in, Kieron Quinn's DarQ. It uses hidden system hooks in Android 10 and higher to force dark mode on unsupported apps, and it has just received its biggest update yet to version 2.0 — complete with wallpaper-based app colors thanks to Android 12's Monet theming system. It even works on lower Android versions.


ANDROIDPOLICE VIDEO OF THE DAY


According to the release notes, version 2.0 is a complete rewrite from scratch, and it packs a lot of improvements. The interface is modeled after Google's latest Material You guidelines, with a big header, wallpaper-based background colors, and smoother overscroll animations. From the looks of it, the app could basically be an Android 12 system app. The wallpaper-based theming works on Android version 5 and higher thanks to a custom MonetCompat library built by the developer. You might have to restart the app or even your phone to have new wallpaper colors applied, though.


DarQ's theming is based on your wallpaper on Android 5+.


On the technical side, DarQ 2.0 gets rid of its reliance on an accessibility service and its own ADB script solution and now instead uses Shizuku, an app that serves as an ADB plug for using restricted system APIs needed by DarQ. Quinn says that you can think of Shizuku as "a Superuser app for non-root devices." You need to start it once per boot by plugging your phone into your computer (not necessary on Android 11 and higher), but it should lead to a much more stable experience for DarQ than the old accessibility method, so the tradeoff is worth it.


Functionally, the app still works as it used to. You can either choose to have all apps dunked into the forced dark mode or pick individual apps that don't have a dark theme of their own yet.


DarQ initially didn't properly work on Android 12 because of an issue with Shizuku. The ADB app has since received an update to version 11.7.0 that fixes the problem in question, and now, DarQ 2.0 runs without restrictions.


If you want to play with the Monet colors some more, tap the version info in the app ("DarQ v2.0") a few times to activate its developer options, and you can manually pick a color for your wallpaper instead of relying on the automated selection.


You can read more about DarQ on the project's GitHub page, where it's also available for download, but you can get it over at APK Mirror, too.


UPDATE: 2021/06/30 3:42am PDT BY MANUEL VONAU


Text updated with details on Android 12 compatibility and Monet.


Readmore : apps that are essential for all Android users


Source: www.androidpolice.com

How to Install Magisk to Root or Customize your Android Phone


How to Install Magisk on your Android Phone


If you’ve ever thought of rooting your phone or modding certain aspects of it, the chances are you’ve heard of Magisk. But what is Magisk? Magisk is a tool that can be used to gain root access on your device, similar to SuperSU but it’s not limited to just that. Developed by topjohnwu, a Senior Recognized Developer at the XDA Forums, Magisk is a portal that enables all sorts of modifications on your Android phone. There are several Magisk Modules you can install on your phone for different purposes.


Magisk v17.2

There are modules for theming, ad blockers, enabling Camera2API, and a lot of other system-level modifications you can’t do otherwise. If you’re a power user and want to extend the functionality of your phone and push it to its limits, you need to try out Magisk. If all this sounds fun to you, we’ll tell you how you can install Magisk on your Android device to customize it and do things you never thought of doing on your phone.


Installing Magisk requires you to have a custom recovery for which your phone needs to have an unlocked bootloader. If you’ve already unlocked the bootloader on your phone, you’re good to go. If you haven’t and you don’t know what we’re talking about, we recommend you head over to the XDA Forums, search for your device, and then look for a guide to unlocking the bootloader. There’s no universal method for this, as it differs from phone to phone. Once you’ve unlocked the bootloader, you can proceed further.


Disclaimer: Unlocking the bootloader will wipe all the data on your smartphone and in some cases, may even void your warranty. It’s advisable to back up all your data before performing these steps. It’s also important to understand that not following the steps correctly may result in a bricked phone so make sure you know how to recover your phone back to its original state in case you end up in a situation like that.


Furthermore, Magisk may cause issues with a few banking and payment-related apps so if those are absolutely vital to you, proceed with caution.


Before we begin, make sure you have access to a PC/Mac with ADB and Fastboot installed.


Step 1: Identifying the type of boot image


Download the latest version of the Magisk app from the project’s GitHub repository. Since the APK of Magisk is hosted outside the Google Play Store, you may need to allow sideloading apps from unknown sources first and then manually install the downloaded package.


After installing, open the Magisk app. You should see a screen like this:


Magisk main app window


Now, we need to note down the values of the following parameters:


Step 2: Locating the boot image


In order to patch the boot image for your device, you need to extract it from the official firmware packages. In case you’re using a custom ROM like LineageOS, the flashable ZIP file contains the boot image.


Case I: You have access to the recovery-flashable ZIP file


If you have a device that still uses the A-only partition scheme, you can find the ‘boot.img’ right inside the recovery-flashable ZIP file. Just extract it using a suitable archiver program.


POCO M3 boot.img inside recovery ZIP


Notice the boot.img file inside POCO M3’s recovery ZIP.


However, if your device utilizes the A/B partition scheme, then the boot image and other partition images are further packed inside a file named payload.bin as shown below.


Google Pixel 5 payload.bin inside recovery ZIP


The recovery ZIP of the Google Pixel 5 contains a payload.bin file. In that case, you have to extract the payload.bin file first, then use one of the community-developed payload.bin unpackers to get the boot.img out of it. We strongly suggest you opt for the extractor written in Go as it’s cross-platform and has been actively developed.


Known as ‘payload-dumper-go’, this fork even allows end-users to extract a single partition image without unpacking the whole payload.bin, which is particularly useful for this usage scenario.


  • First, use the -l parameter to list the partition images inside the payload.bin.
    payload-dumper-go -l payload.bin

  • Then use the -p parameter with the name of the boot image (commonly stored as “boot”) to extract it.
    payload-dumper-go -p boot payload.bin


ASUS ROG Phone 5 boot.img from payload.bin


Case II: You have access to the Fastboot-flashable image


A handful of OEMs like Google and Xiaomi provide Fastboot-flashable factory images for their devices. If you managed to grab such a package, then the raw ‘boot.img’ can easily be extracted from the archive.


Google Pixel 5 boot.img from Fastboot package


Special Case: Samsung


Samsung Galaxy devices don’t a traditional Fastboot interface, hence their factory images are packed differently.


  1. Use Samsung Firmware Downloader to download the factory image for your model.

  2. Unzip the decrypted package and locate the AP tar file to your device. It is normally named as AP_[device_model_sw_ver].tar.md5.


Step 3: Patching the boot image


Now we have the boot image in hand, we should proceed with the patching part.


Case I: The value of the “Ramdisk” parameter is “Yes”


  • Copy the boot image to your device. In fact, you can patch it on a different Android device than the target one, but you need to install the Magisk app on the secondary device as well.

  • Press the Install button on the Magisk card.

  • Choose Select and Patch a File under method, and select the stock boot image.


Magisk select and patch image


  • The Magisk app will patch the image to [Internal Storage]/Download/magisk_patched_[random_strings].img.


Magisk is patching a boot image


  • Copy the patched image to your PC with ADB:
    adb pull /sdcard/Download/magisk_patched_[random_strings].img

  • Flash the patched boot image to your device. For most devices, reboot into Fastboot mode and flash with the following command:
    fastboot flash boot /path/to/magisk_patched.img

  • Reboot and enjoy Magisk!


Keep in mind it’s possible to patch the boot image on the fly on legacy devices having boot ramdisk through a custom recovery like TWRP, but the method is no longer recommended on modern devices. Having said that, if you have an old phone and want to stick with the custom recovery route, the steps are as follows:


  • Download the Magisk APK.

  • Rename the .APK file extension to .ZIP (e.g. Magisk-v23.0.APK → Magisk-v23.0.ZIP).

  • Flash the ZIP file just like any other ordinary flashable ZIP.


Magisk flashing via TWRP


  • Note that the sepolicy.rule file of modules may be stored in cache partition, so do not clear it.

  • Check whether the Magisk app is installed. If it isn’t installed automatically, manually install the APK.


Case II: The value of the “Ramdisk” parameter is “No”


In this case, you need to locate the recovery.img file from the factory image of your device instead of boot.img file. This is because Magisk needs to be installed in the recovery partition, which means you’ll have to reboot to the recovery mode every time you want to access Magisk.


  • Copy the recovery image to your device (or a secondary device with the Magisk app installed).

  • Press the Install button on the Magisk card.

  • Choose Select and Patch a File under method, and select the stock recovery image.

  • The Magisk app will patch the image to [Internal Storage]/Download/magisk_patched_[random_strings].img.

  • Copy the patched image to your PC with ADB:
    adb pull /sdcard/Download/magisk_patched_[random_strings].img

  • Flash the patched recovery image to your device. For most devices, reboot into Fastboot mode and flash with the following command:
    fastboot flash recovery /path/to/magisk_patched.img

  • Reboot.


At this stage, there are three possible scenarios:


  • Power up normally: You’ll end up with no Magisk.

  • Recovery Key Combo → Splash screen → Release all buttons: The system should boot with Magisk.

  • Recovery Key Combo → Splash screen → Keep pressing volume up: To access the stock recovery mode


Special Case: Samsung


  • Copy the extracted AP tar file to your device.

  • Press the Install button on the Magisk card.

  • If your device doesn’t have a boot ramdisk, make sure Recovery Mode is checked in options.

  • Choose Select and Patch a File under method, and select the AP tar file.

  • The Magisk app will patch the whole firmware file to [Internal Storage]/Download/magisk_patched_[random_strings].tar

  • Copy the patched tar file to your PC with ADB:
    adb pull /sdcard/Download/magisk_patched_[random_strings].tar
    • Don’t try to copy over the MTP interface as it is known to corrupt large files.

  • Reboot to download mode. Open Odin on your PC, and flash magisk_patched.tar as AP, together with BL, CP, and CSC from the original firmware.
    • Don’t choose HOME_CSC because we want to wipe data.

  • Your device should reboot automatically once Odin finished flashing. Agree to do a factory reset if asked.

  • If your device doesn’t have a boot ramdisk, reboot to recovery now to enable Magisk.

  • Install the latest Magisk app and launch the app. It should show a dialog asking for additional setup. Let it do its job and the app will automatically reboot your device.

  • Reboot and enjoy Magisk!


Step 4: Verification


The last step is to verify that everything is working properly. Locate the newly installed Magisk app and open it. We want to see a version number beside the “Installed” parameter. This means you have successfully installed Magisk. Great job!


A successful installation of Magisk


Now you have Magisk installed, it’s time to try out some nice Magisk Modules. You can find lots of modules for specific purposes, and since Magisk gives you root access, you can even install some of the best apps for rooted devices. So install whichever apps and modules you like and get tweaking!


Readmore : apps that are essential for all Android users


Source: www.xda-developers.com

Best Android Keyboard Apps: Gboard, Swiftkey, Chrooma, and more!


The


The keyboard is probably one of the most used apps on any Android device, and possibly also one of the most underappreciated ones. Most of the time, you’ll be perfectly content with the keyboard that comes pre-installed on your device. But that’s until you discover that there are so many awesome keyboards out there that can really take your typing experience to the next level. It’s easy to become complacent with what comes pre-installed and stick with it forever — even if it’s not the best option. But why settle for something mediocre?


We’ve compiled a list of the best keyboard apps Android has to offer to help you type faster, with less effort, and also look good while at it. These keyboards have years of experience and user feedback behind them. They know their job very well. Besides offering to correct your spelling mistakes, they also suggest the right words at the right time, and some of them even automatically fetch one-time-passwords from your SMS app and offer a wide range of customizations.


Gboard


Gboard used to be a pretty vanilla keyboard, but steady feature additions and improvements over the past couple of years have made it one of the best in the business. Accurate word predictions, smooth glide typing, nifty gesture controls for cursor and deletion, Google Assistant and Google Translate integration, and multilingual typing are some of the main reasons why Gboard should be your default keyboard. Since it’s a Google app, it’s always getting better.


For example, Google is testing a new feature in the app that will make it even more convenient to quickly access clipboard content, while in Android 12, the keyboard will sync its theme with your wallpaper. The sluggishness and laggy experience that many users had complained about are gone too. It’s now as fast and smooth as it can get.


Swiftkey


Swiftkey has been around since the old days of Android and remains the most versatile and feature-packed keyboard you can get on the Google Play Store. Customization is the name of the game with Swiftkey, and there are tons of options and controls to really make your keyboard your very own.


The thing I like the most about Swiftkey is that all essentials are accessible right from the keyboard. Like Gboard, it also has a quick access bar at the top with shortcuts for GIFs, stickers, clipboard, and translator. The word predictions and auto-correct have gone a bit off lately, but hopefully, this will be fixed with updates.


Chrooma


If there was ever an RGB equivalent of PC keyboards on Android, it would have to be Chrooma. Chrooma’s main attraction is that it adapts to the primary color scheme of the app you’re using. It turns green when texting in WhatsApp, orange while in Gmail, and so on. It comes with dozens of skins and color palettes, including a cool RGB theme. There’s never a dull moment while using this keyboard.


If you ever get bored of the monotonous look of Gboard or your stock keyboard, this is the one that will refresh your typing experience. Besides colors and adaptive themes, Chrooma also has an extensive set of useful features, including gesture typing, AI-powered contextual word predictions, One Hand Mode, split layout, Night Mode, and many more.


Fleksy


Fleksy has everything and the kitchen sink. Its autocorrect game is solid, and the clean design will make you feel right at home if you’re coming from Gboard. Apart from offering all keyboard essentials, Fleksy has some unique add-on features, called Extensions, that you’ll not find in other keyboard apps. You can add a row of the most frequently used emoji, symbols, URLs, etc.; make the keyboard completely invisible; add cool typing effects; create shortcuts for words and phrases, and so on.


Fleksy also offers what it refers to it as mini-apps, which lets you browse and share GIFs, memes, stickers, YouTube videos, etc., right from the keyboard. Fleksy has over 100+ themes designed by popular artists, and you can also create your own using a photo from your gallery or Unsplash library.


Grammarly Keyboard


Many of us have the Grammarly extension installed in our PC browser to keep our emails and writing free from grammatical errors and spelling mistakes. The Grammarly Keyboard brings the same peace of mind to your phone. Sure, it’s not the most feature-packed keyboard out there, and you’ll miss out on stickers, GIFs, themes, etc. But that’s not the reason to use Grammarly Keyboard in the first place. Grammarly Keyboard is for those who care about language and grammar above anything else.


Grammarly’s dead-accurate grammar and spell checker will catch most, if not all, of your embarrassing mistakes while also showing you the correct form and usage, so you learn from it and hopefully don’t repeat them. The free version of Grammarly Keyboard gets the job done for casual usage. There’s a premium subscription plan for more serious use cases that provides suggestions on more advanced grammatical issues, tone detection, word choice, fluency, and more.


Simple Keyboard


Simple Keyboard is, well, very simple. It’s truism, but it’s worth stating because that’s what the Simple Keyboard is all about. It gives you a simple, clutter-free keyboard that doesn’t bombard you with gimmicky features or ask you to hand over your data to “improve your experience.” It weighs about 1MB in size and doesn’t ask for any sensitive permission — in fact, it only needs a single permission: for haptic feedback.


Since simplicity, privacy and speed are the main focus points here, the keyboard does away with features like emoji, GIFs, spell checker, and gesture typing. It’s not for mainstream users, but those who care deeply about privacy will certainly find this a great choice.


These are the best Android keyboard apps that will help you type faster, better, and with less effort. Which keyboard you should pick from the list is your own personal decision. There’s no one size fits all — although some come quite close to it — we’re pretty sure you’ll definitely find your soul keyboard among our recommendations. My personal favorite is Gboard, and I use it on all my Android phones. When I get bored, I also take Chrooma and Fleksy for a spin from time to time.


Whatever keyboard app you end up picking, be sure to give your brain some time to adjust to a new keyboard, as it will take a few days to unlearn the old habits you developed with your old keyboard. If you’re looking for more recommendations, we also recommend these great Android apps, and these amazing Android games.


Readmore : apps that are essential for all Android users


Source: www.xda-developers.com

How to Install HD Streamz APK on FireStick [Step-by-Step: 2022]


how to install hd streamz apk on firestickIn this walkthrough, I will guide you through the process to install HD Streamz on FireStick 4K. The same method works equally well on other Fire TV devices including Fire TV Stick4K, FireStick Lite, and Fire TV Cube, and even some older versions.


HD Streamz is a FireStick app that features hundreds of Live TV channels from many parts of the world. You may watch live streams of channels from the USA, UK, France, India, and more.


The app also has Radio and On-Demand sections but they hardly have any interesting content. The app is best used for Live TV streaming. You will also find this app in our list of best apps for FireStick.


Steps to Install HD Streamz on FireStick


Let us get started with the installation process.


Attention, FireStick Users!


Governments and ISPs constantly monitor your online activity, and accessing copyrighted content on your Fire TV Stick could lead to serious trouble. Currently, your IP is visible to everyone. I strongly recommend getting the best FireStick VPN to mask your IP address and securely stream your favorites.


I personally use ExpressVPN, the fastest and most secure VPN available. Not only is it easy to install on any device, it comes with a risk-free 30-day money-back guarantee. Plus, if you're not 100% satisfied, you can always get a refund. ExpressVPN is currently also offering a whopping 3 extra months free on their annual plan!


Here are reasons why using a VPN at all times is essential.


Read: How to install & use a VPN on FireStick


Method 1: HD Streamz on FireStick using Downloader


Downloader is probably the most popular application to sideload or install third-party apps on FireStick.


Here are the steps you need to follow:


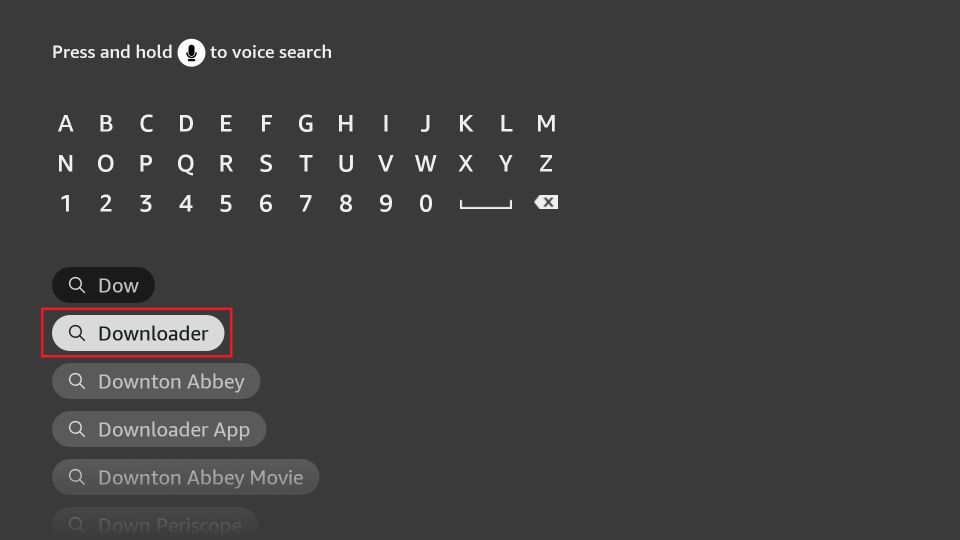
1. Install the Downloader app from the Amazon Store


You can do that by choosing the Find > Search option on the home screen


how to install hd streamz on firestick


2. Just search for the Downloader app and follow the onscreen instructions to get it.


If you want detailed instructions, we have a complete guide on how to sideload apps on FireStick


hd streamz on firestick


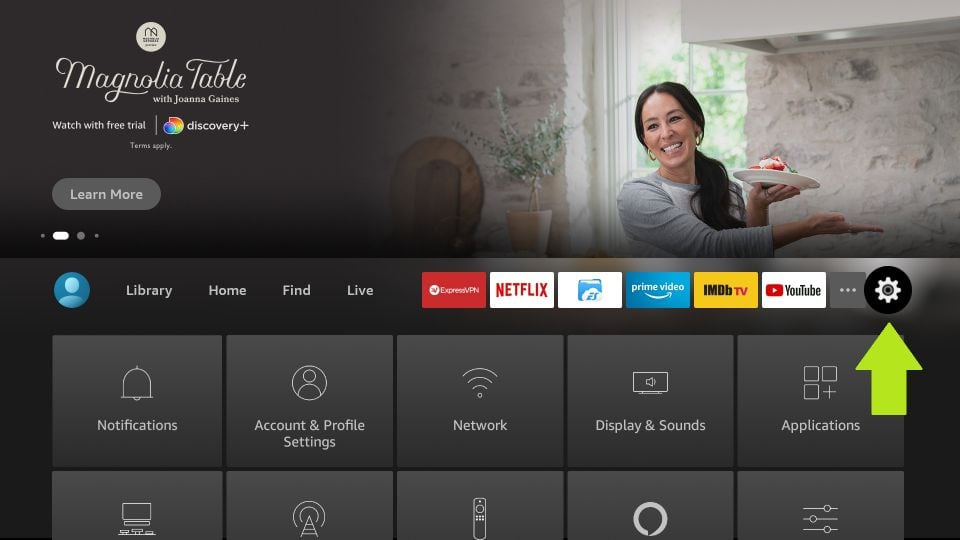
3. Go to the main window of your FireStick and select the Settings in the menu
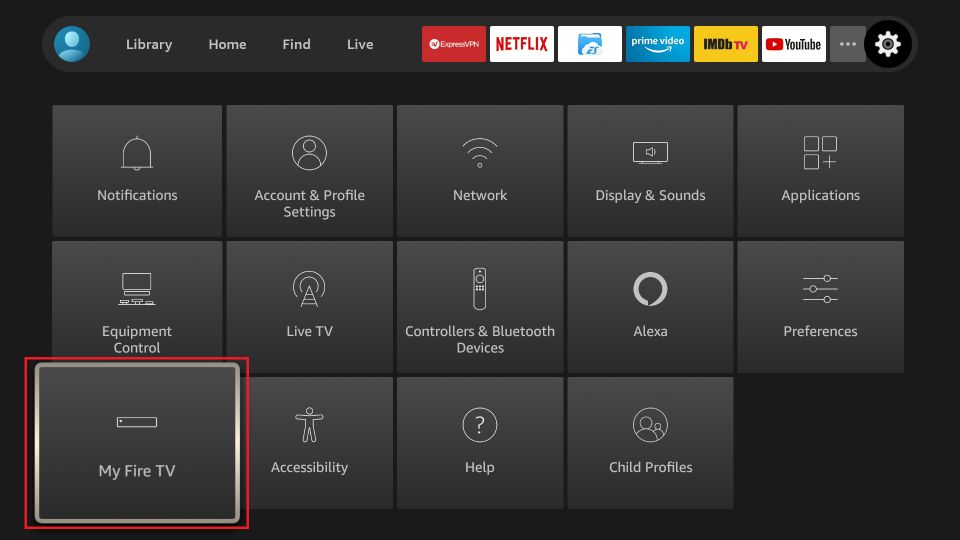


how to install hd streamz on firestick


4. Click My Fire TV


hd streamz apk on firestick


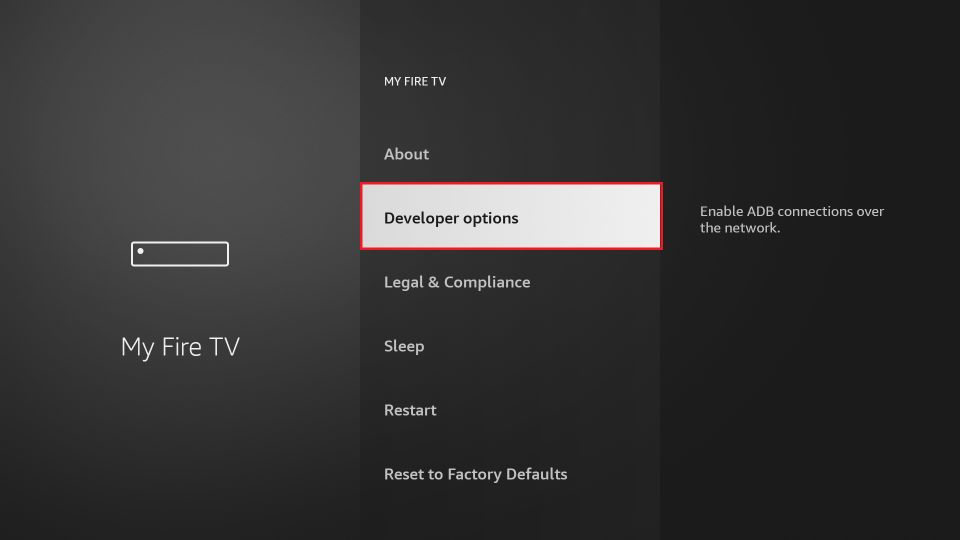
5. Select and open Developer Options on the window that follows next


hd streamz apk


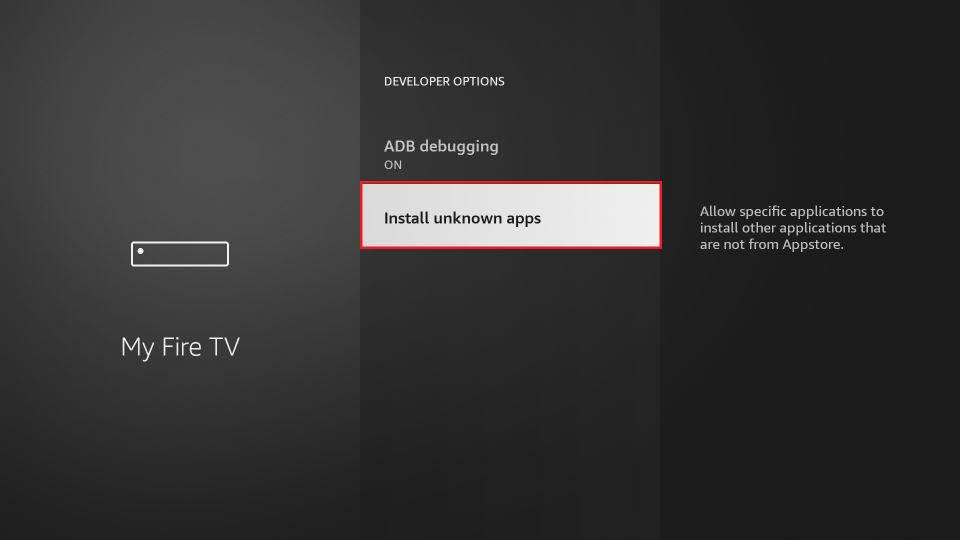
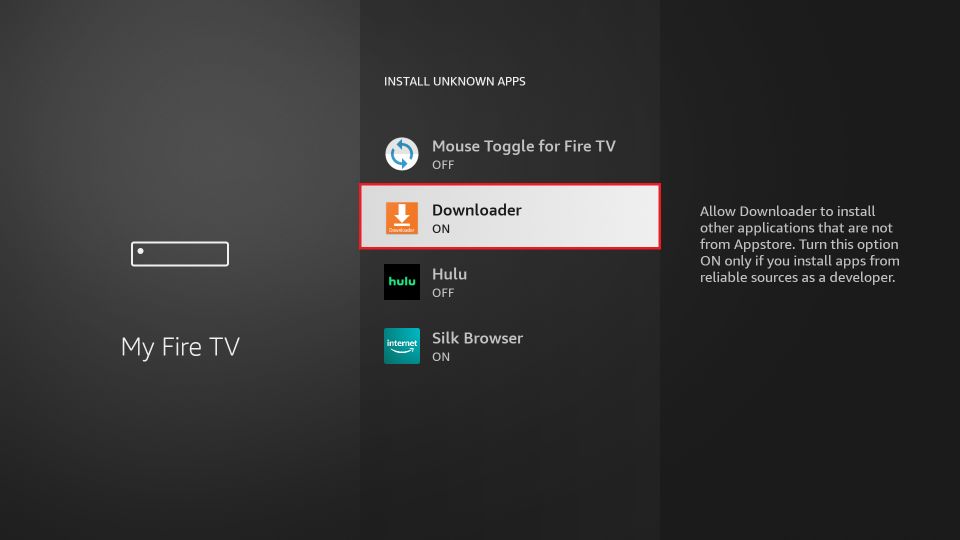
6. Click Install Unknown Apps


download hd streamz on firestick


7. Turn ON Downloader


firestick hd streamz apk


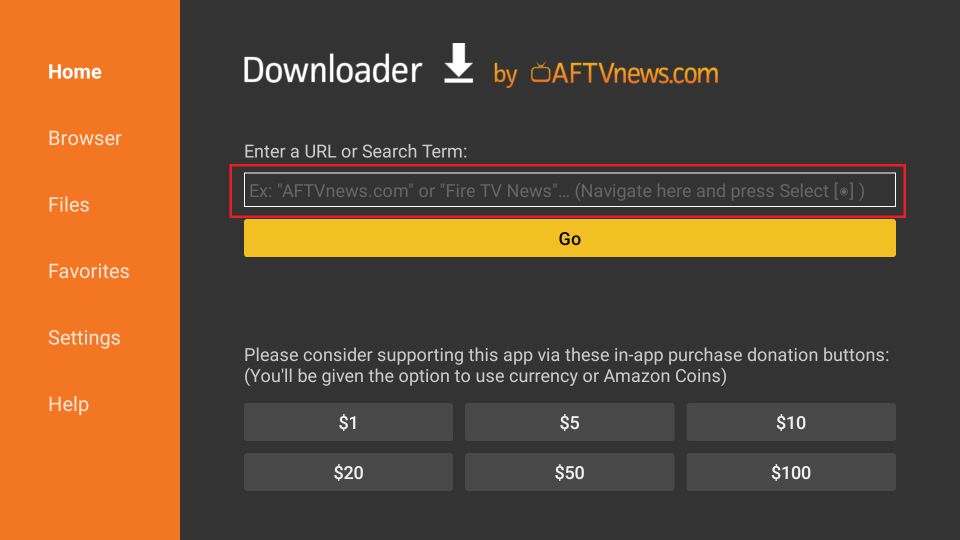
8. Run the Downloader app. This is the home window of the app. In the right section, click the field where it asks you to enter the URL


how to install hd streamz on firestick


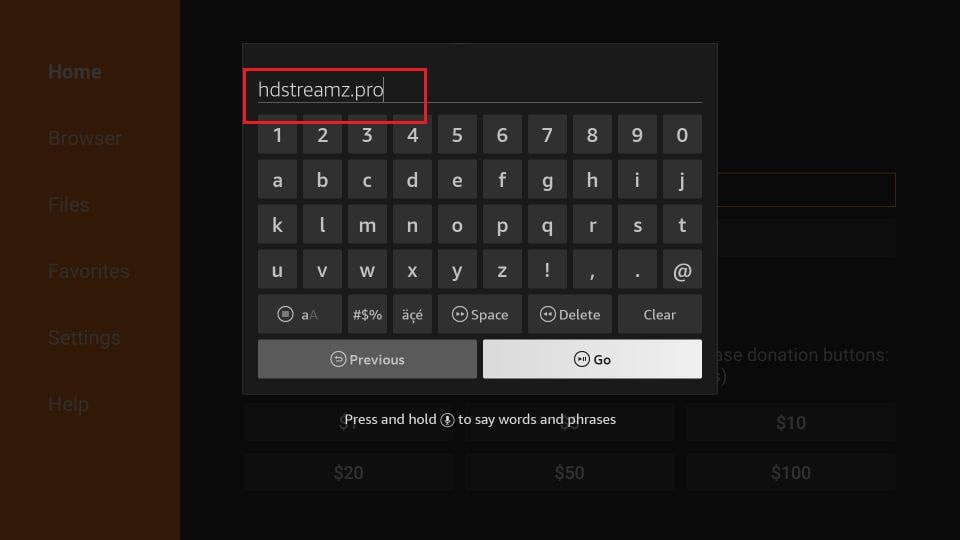
9. Now type the following source URL: hdstreamz.pro


Click GO


firestick hd streamz apk


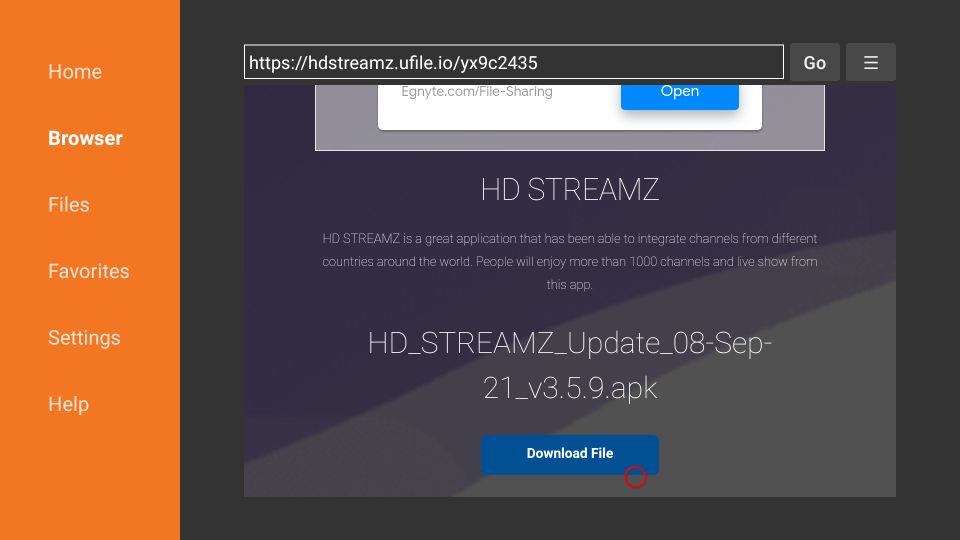
10. A webpage will load now. Scroll down if needed and click the Download link


how to install hd streamz on firestick


11. On the next page, scroll down and click the download link again


click the download link again


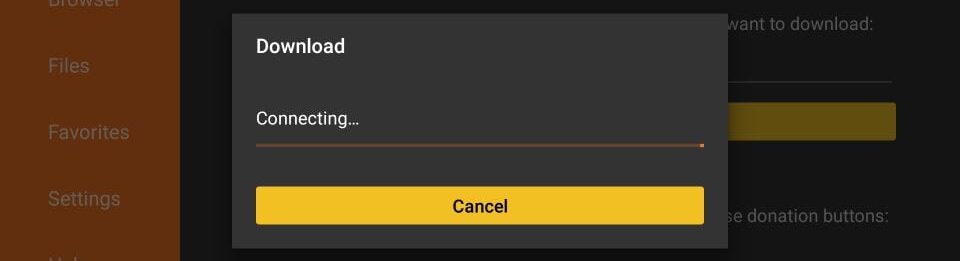
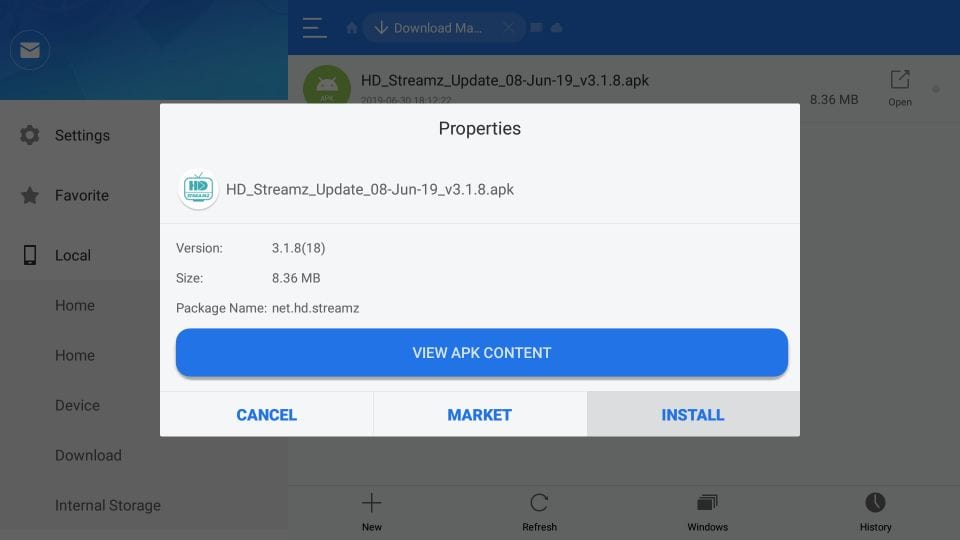
12. Wait until the HD Streamz APK is downloaded on FireStick


hd streamz firestick app


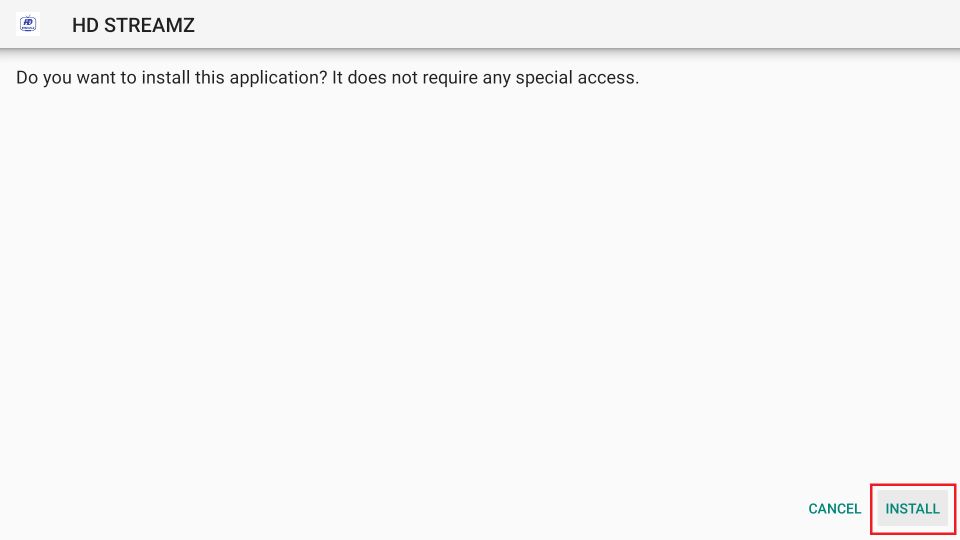
13. The installation prompt is automatically triggered. Go ahead and click Install


how to install hd streamz on firestick


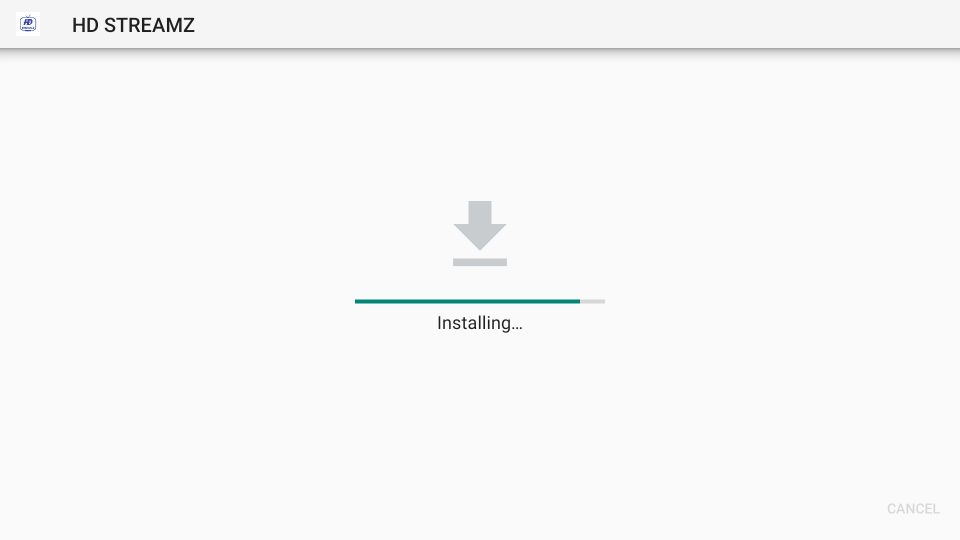
14. Wait for the installation to finish. Takes less than a minute usually.


installing hd streamz apk


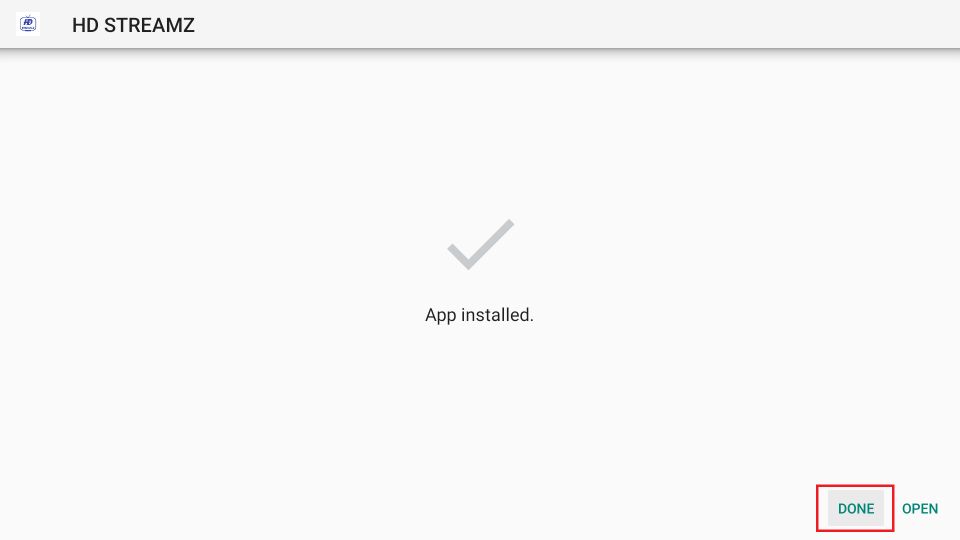
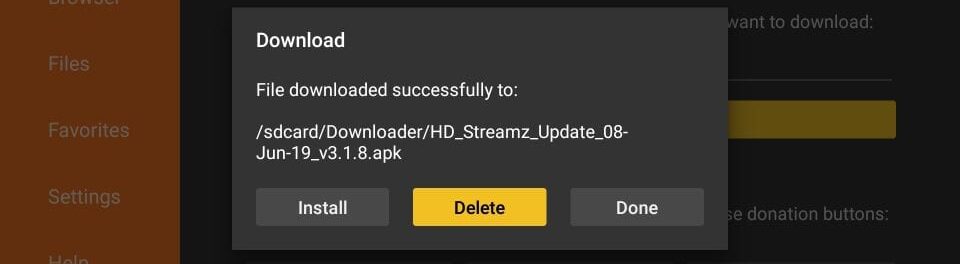
15. If you want to get started streaming right away, go ahead and click Open.


I am proceeding with Done. That’s because I am going back to the Downloader app to delete the APK file we downloaded. It is not needed anymore. Let’s remove it to clear some space.


click done


16. Click Delete


hd streamz firestick app


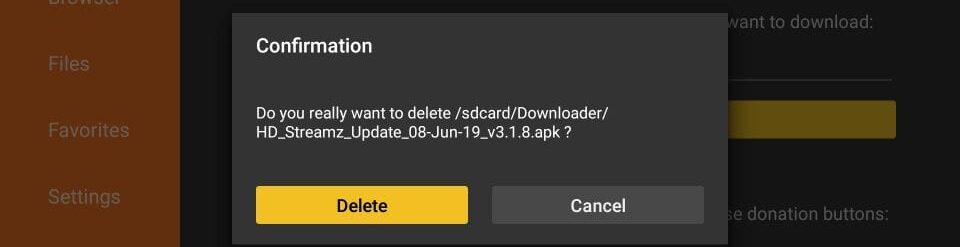
17. And, click Delete again


how to install hd streamz on firestick


Great! You are now all set to use HD Streamz FireStick app.


Method 2: Install HD Streamz on FireStick using ES File Explorer


Note: ES File Explorer will cost you $9.99 per month if you want to use it to install third-party apps like HD Streamz. This is just an alternate method in case you can’t get the Downloader app in your region/country.


ES File Explorer is a file manager application. However, it is also commonly used on Android devices as a sideloading utility. Here is how you can install the HD Streamz FireStick app using this app:


1. Download and install ES File Explorer on FireStick


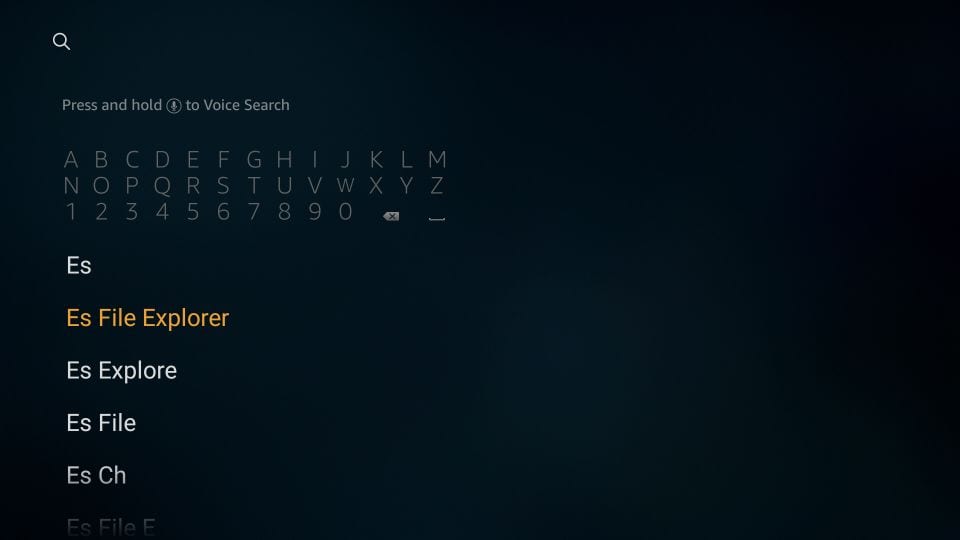
This app is available on the Amazon Store. Go to the FireStick main window and select the magnifying glass (lens) option in the top-left corner


Look up for ES File Explorer. Follow the on-screen instructions to install it


hd streamz for firestick


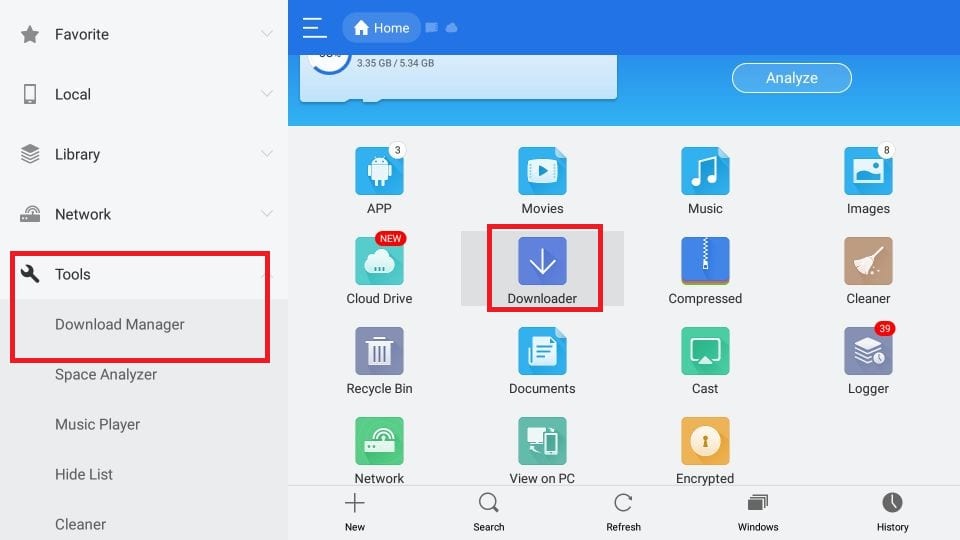
2. Now go ahead and run the ES File Explorer app. You must see this launch screen.


You want to select the Downloader icon in the right section of this window. Or, you may go to the left section and open Tools > Download Manager


hd streamz firestick


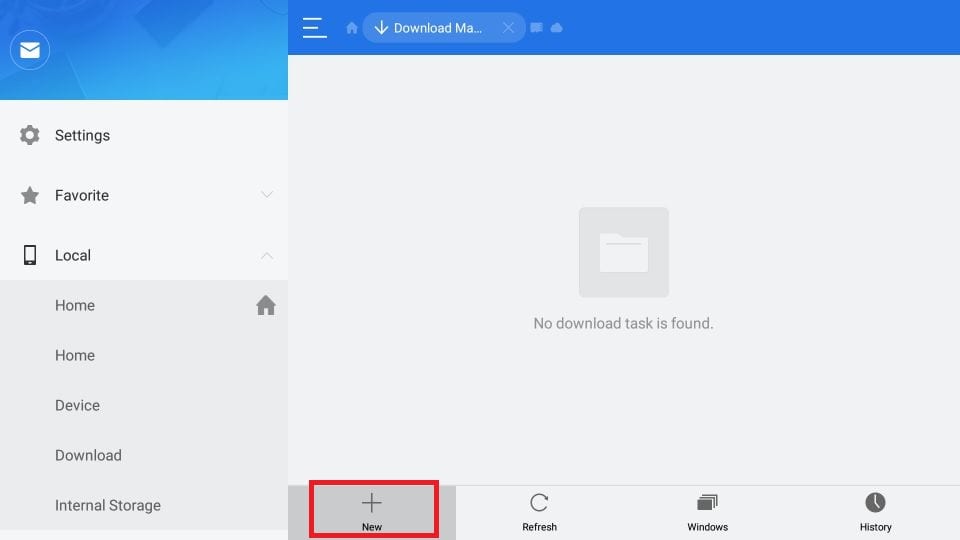
3. Now, you will find a small strip on the right part of the window, on the bottom. Click +New on that strip


how to install hd streamz on firestick


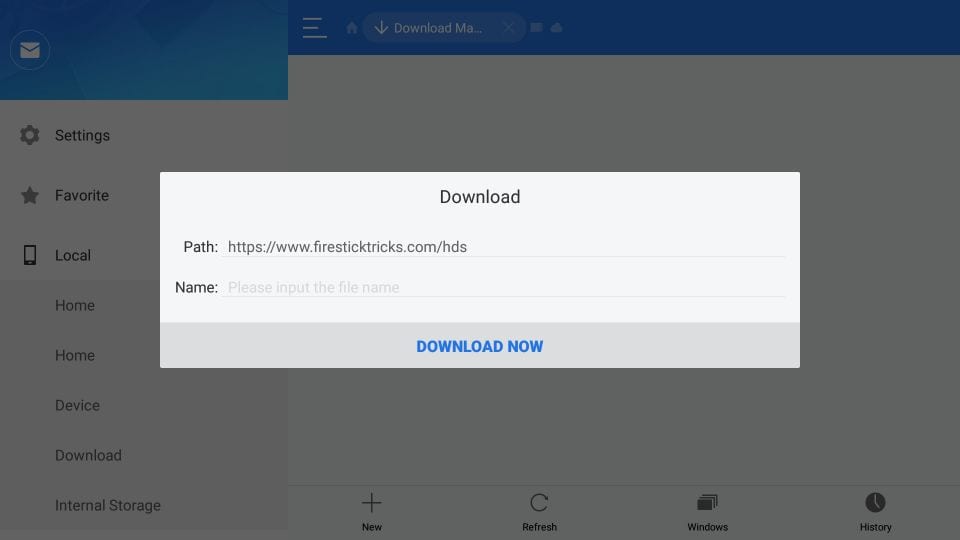
4. What you see now is this dialogue box. Enter the Path as https://www.firesticktricks.com/hds


In the Name section, you may write any name you like. In fact, you may also leave it blank like I am doing


download hd streamz for fire tv


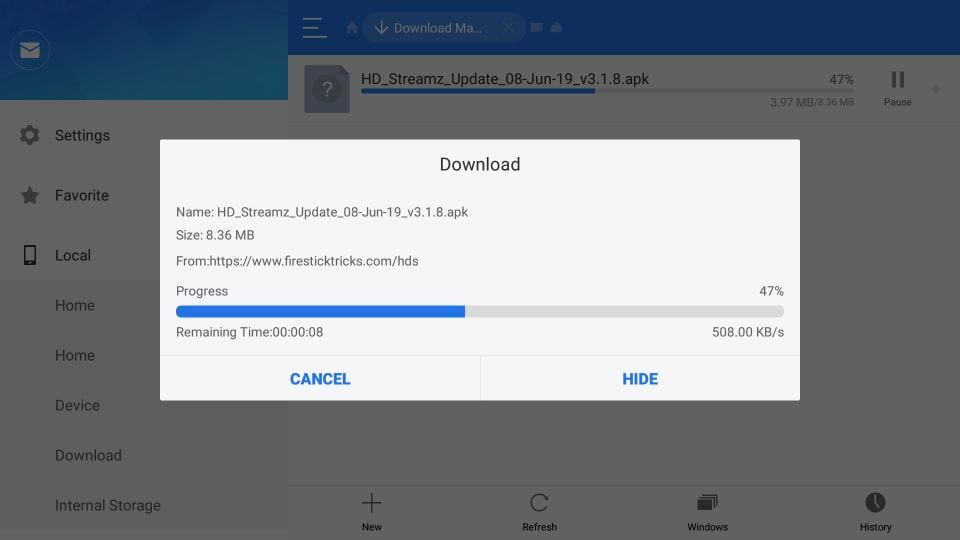
5. ES File Explorer reaches out to the server and begins to download the HD Streamz APK file on your device


The download may take a minute or more to complete


fire tv hd streamz


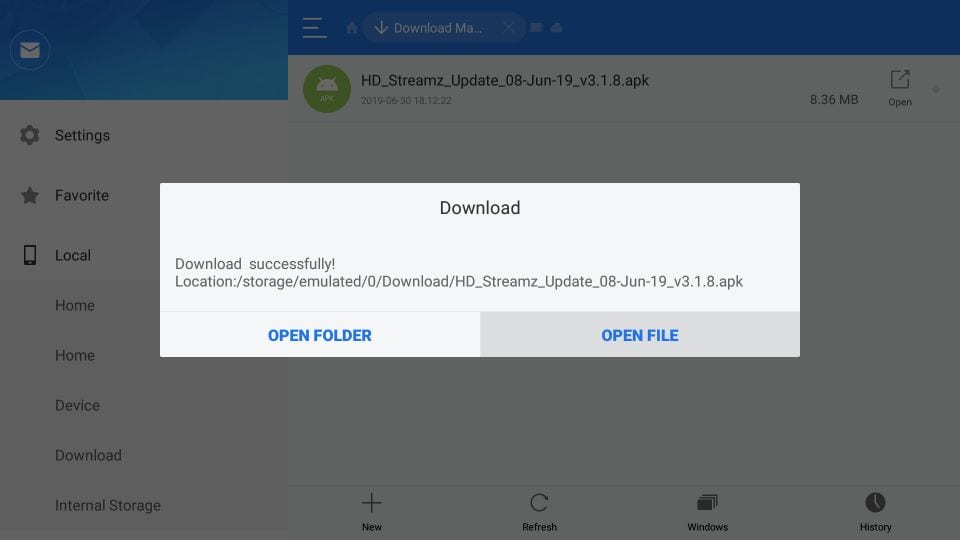
6. We will click Open file after the APK has been downloaded


hd streamz for fire tv


7. Next, we click Install on this ES File Explorer prompt


how to install hd streamz on firestick


8. On this system prompt, we choose and click Install


how to install hd streamz on firestick


9. Now we wait. It will again take a minute to install HD Streamz on FireStick


10- HD Streamz App Installed notification is displayed once the app is installed. Click Open and it will launch the app right from this window. Or, if you wish to use it later, click Done


You may run the app at any time from Your Apps & Games area (demonstrated later in the guide)


Your FireStick / Fire TV is now all ready to stream your favorite content. However, before you start, I would like to warn you that everything you stream online is visible to your ISP and Government. This means, streaming free movies, TV shows, Sports might get you into legal trouble


Thankfully, there is a foolproof way to keep all your streaming activities hidden from your ISP and the Government. All you need is a good VPN for Fire Stick. A VPN will mask your original IP which is and will help you bypass Online Surveillance, ISP throttling, and content geo-restrictions.


I personally use and recommend ExpressVPN, which is the fastest and most secure VPN. It is compatible with all kinds of streaming apps and is very easy to install on Fire TV / Stick.


We do not encourage the violation of copyright laws. But, what if you end up streaming content from an illegitimate source unintentionally? It is not always easy to tell the difference between a legit and illegal source.


So, before you start streaming on your Fire Stick / Fire TV, let’s see how to use ExpressVPN to keep your streaming activities hidden from prying eyes.


Step 1: Subscribe to ExpressVPN HERE. It comes with a 30-day money-back guarantee. Meaning, you can use it free for the first 30-days and if you are not satisfied with the performance (which is highly unlikely), you can ask for a full refund.


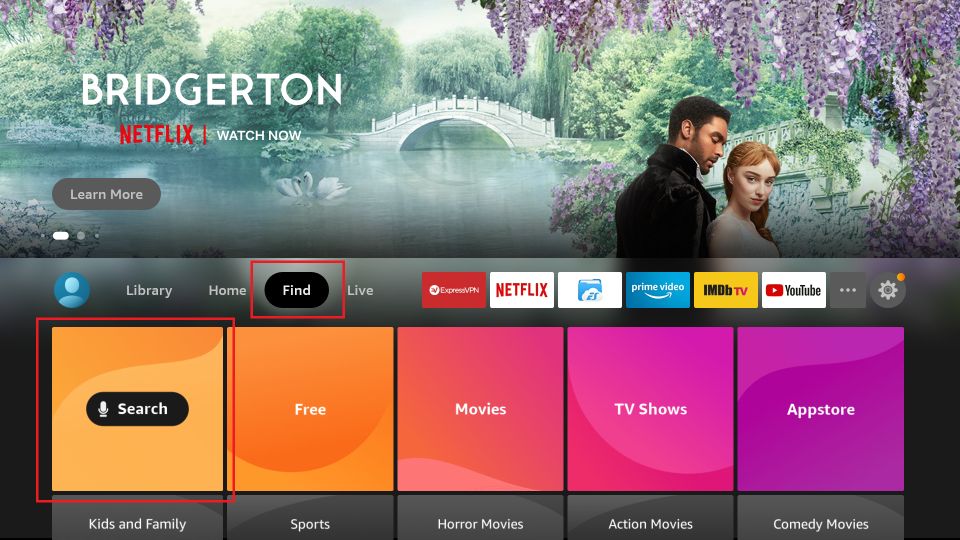
Step 2: Power ON your Fire TV Stick and go to Find followed by Search option.


vpn for jailbroken firestick


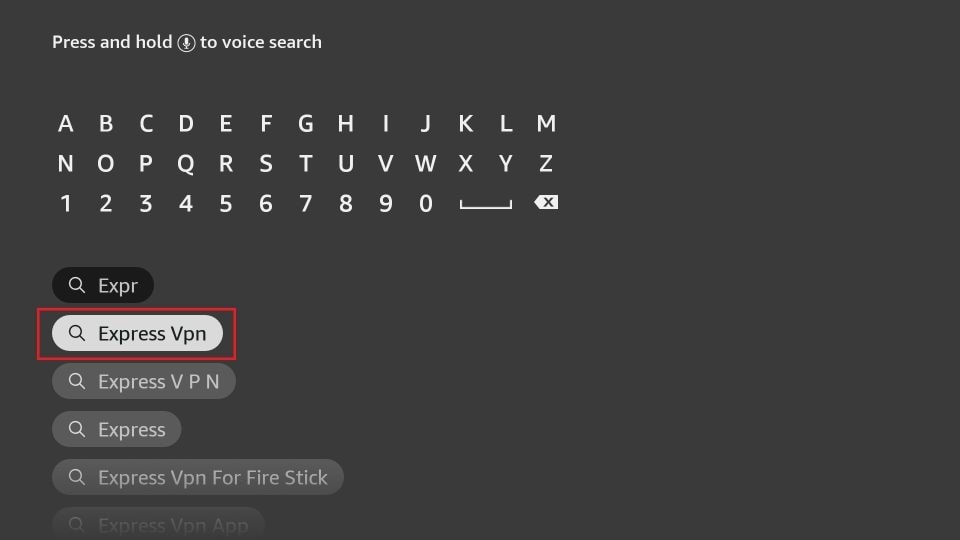
Step 3: Now type “Expressvpn” (without quotes) in the search bar and select ExpressVPN when it shows up in the search results.


install expressvpn


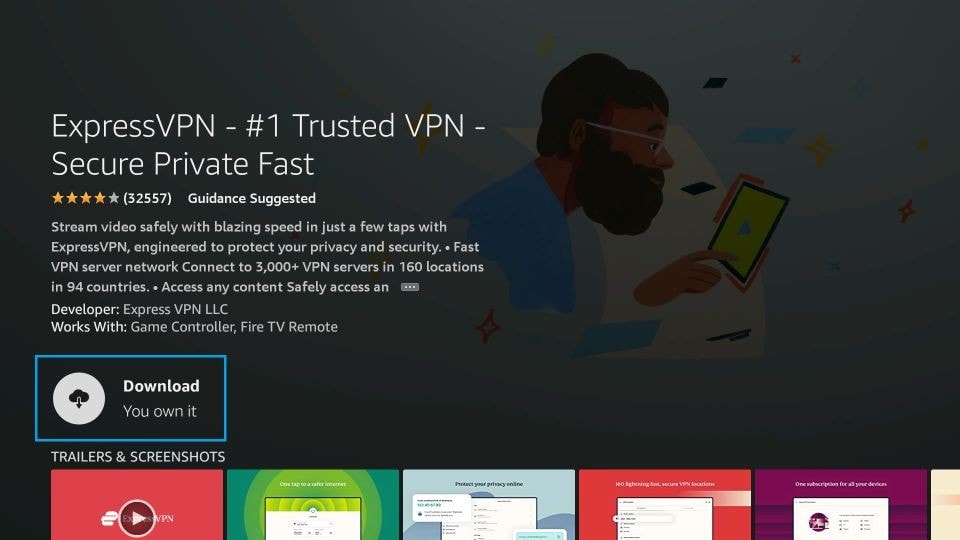
Step 4: Click Download to install the ExpressVPN app on Fire TV / Stick.


get vpn jailbroken firestick


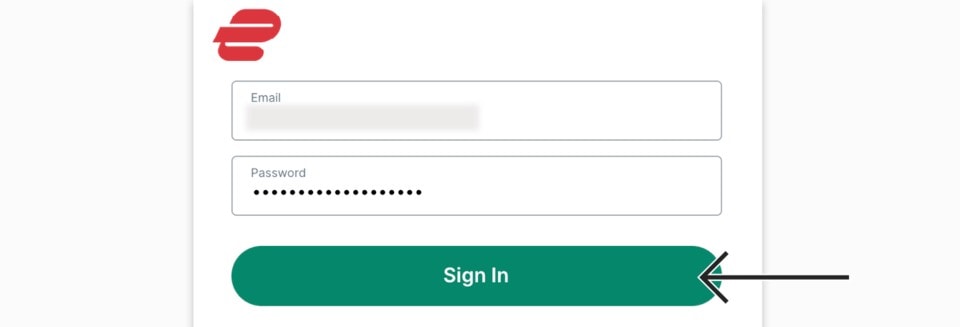
Step 5: Open the app and enter the login credentials that you created while buying the ExpressVPN subscription. Click Sign in.


login expressvpn


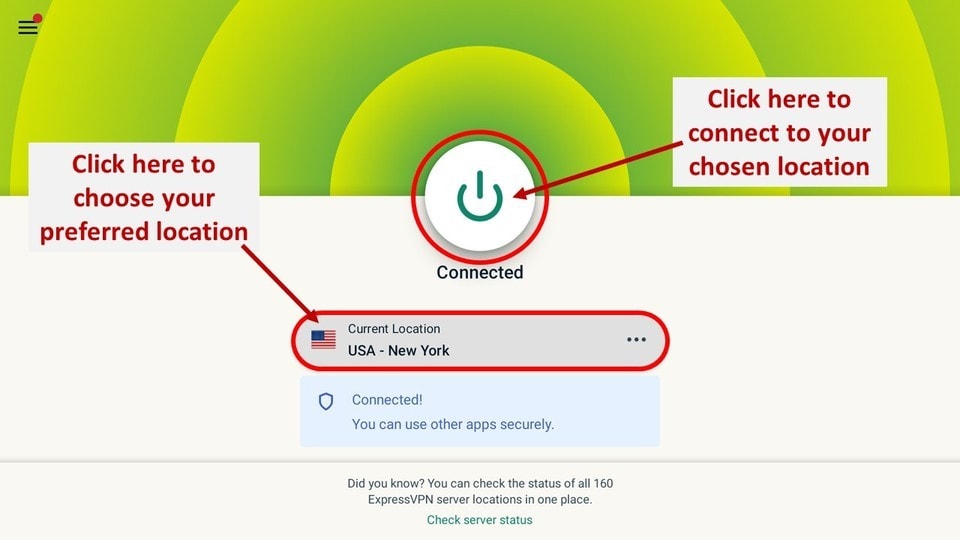
Step 6: Click the Power icon to connect to a VPN server. That’s all. Your connection is now secure with the fastest and best VPN for FireStick.


connect button for expressvpn on firestick


You can also read more detailed info on using ExpressVPN with Fire TV / Stick.


How to Use HD Streamz on FireStick


You will notice that the HD Streamz app is not listed in the ‘Recent’ section on the home window of FireStick. Any app you have just installed can be accessed from the area, Your Apps & Games.


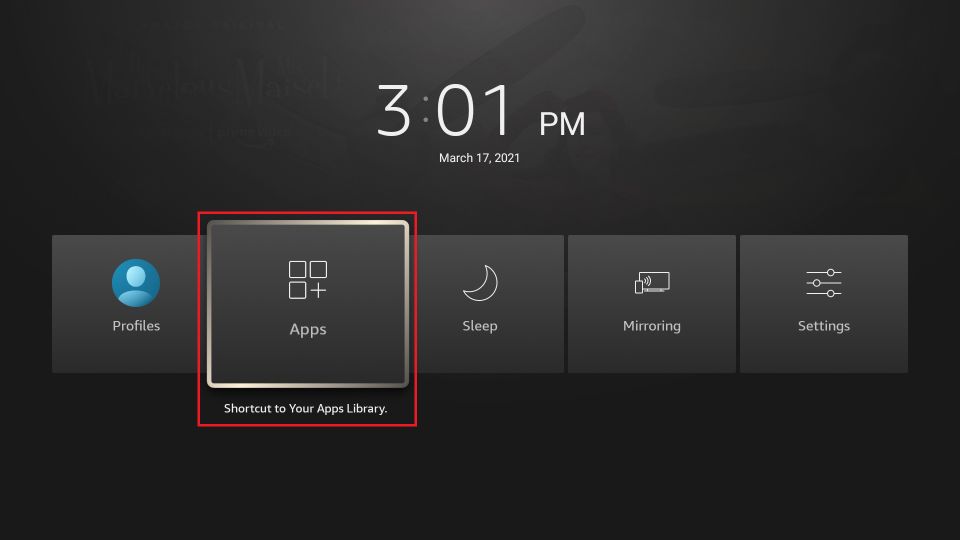
Press and hold the Home button on the remote for a few seconds. Click Apps on the popup window


click apps


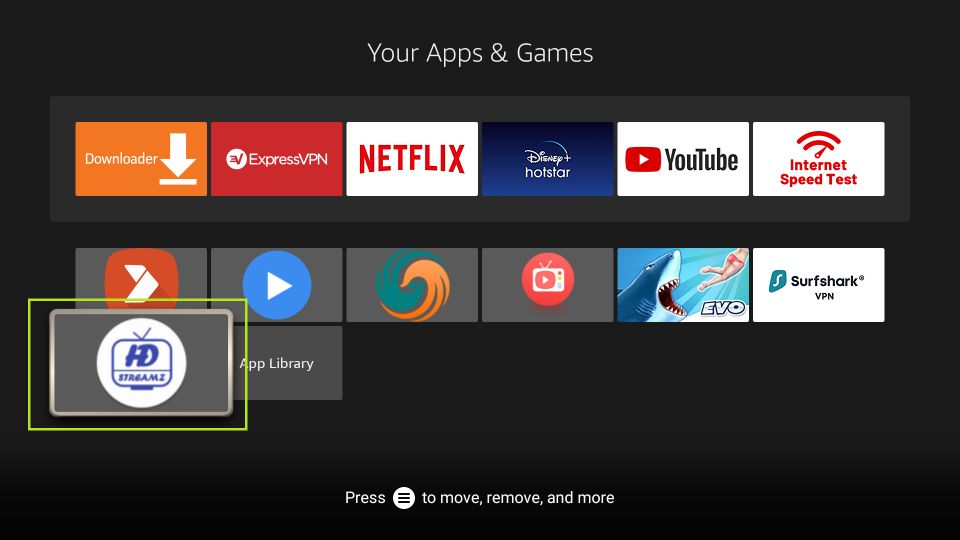
When you are on the Your Apps & Channels window, scroll down to the bottom of the screen and select HD Streamz. Now, here is what you can do. Click the HD Streamz app and open it


how to use hd streamz on firestick


Press the menu button (3 horizontal lines) on the remote. Click Move on the popup in the bottom-left of your display. Drag the app using the navigation keys. Drop it in the first row. HD Streamz will now be available on the home window of FireStick in the row Your Apps & Channels


Click Move on the popup


Now that you know how to access HD Streamz, let us start using it.


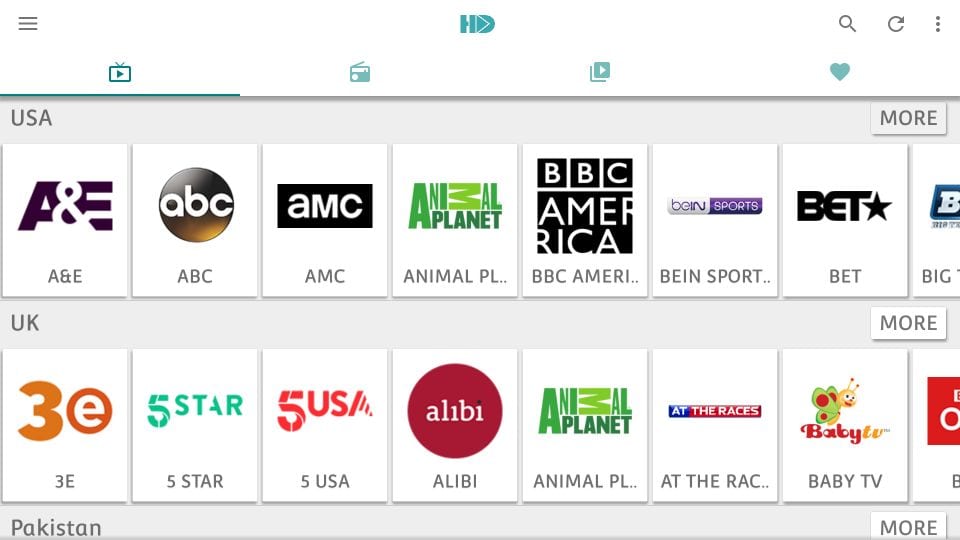
This is the main screen of the app.


how to use hd streamz apk on fire stick


There are 4 tabs on the top as follows:


– Live TV
– Radio
– On-Demand
– Favorites


The On-Demand section is all but dysfunctional. You may not find any interesting content here. However, HD Streamz is primarily for Live TV.


The main window of the app opens to the Live TV tab by default. It has the ‘Explore Categories’ on the top. You may click a category to filter the Live TV channels accordingly.


The channels in the Live TV section are listed country-wise. As I write this guide, the USA category is third on this list after Bangladesh and India.


There aren’t a lot of options to explore in the Radio tab as well. You may find one or two interesting options though.


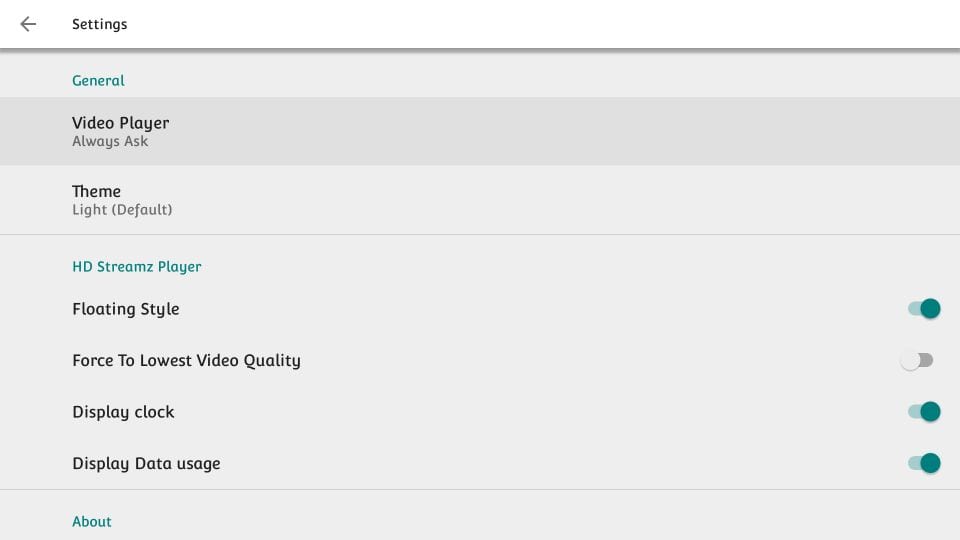
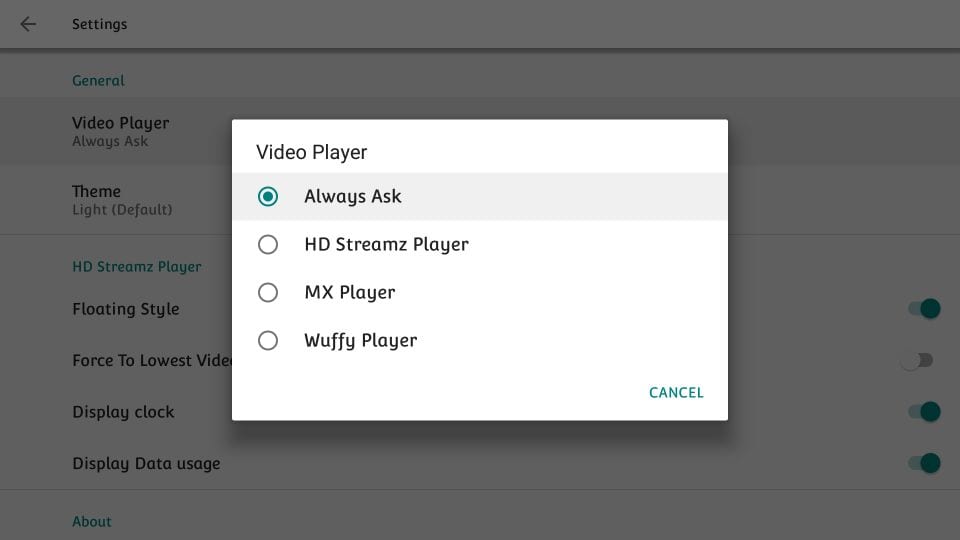
Every time you play a channel, HD Streamz will ask you to choose a player. You can avoid this by choosing a default player in the app Settings. Such as MX Player


Click the hamburger menu in the top-left corner of the app and click Settings


hd streamz firestick app


In the General category, click Video Player


set up hd streamz on firestick


Now choose the default player


download and install hd streamz on firestick


Verdict


Let me start with an honest opinion. HD Streamz is not the greatest streaming app for FireStick. So, why this guide? For starters, it is a popular app and if you are here, I am assuming you were looking for it. Secondly, it has a decent collection of Live TV channels. Hence, I thought it would be a good idea to make you aware that it exists so that you can make an educated choice.


The app could be better though. Developers need to work a bit on the interface, which is not exactly smooth. It would also be nice if they could add more stations to the Radio section. And, of course, fewer ads never hurt anyone.


Related:


Legal Disclaimer
- FireStickTricks.com does not verify the legality or security of any add-ons, apps or services mentioned on this site. Also, we do not promote, host or link to copyright-protected streams. We highly discourage piracy and strictly advise our readers to avoid it at all costs. Any mention of free streaming on our site is purely meant for copyright-free content that is available in the Public domain. Read our full disclaimer.


Disclosure
- FireStickTricks.com is reader-supported blog. When you buy a product through links on our site, we may earn commission. Learn More


Readmore : Android Apps Every User Should Have


Source: www.firesticktricks.com

6 Android Cleaner Apps That Really Clean Up Your Device (No Placebos!)


Most people only think about cleaning up their phone when something starts to go wrong. Android devices are smart enough that regular maintenance isn't necessary, but it's still a good idea to perform a digital tune-up every once in a while. Don't underestimate the impact of staying digitally organized and having free space when you need it.


The trick is finding phone cleaner apps that actually live up to their promises. At best, a bad cleaner app wastes storage space; at worst, it could infect you with malware and spam you with ads. Not all Android cleaner apps are useless, however.


Here are the best cleaner apps for Android phones and tablets you should try.


1. Files by Google


Google's official Android file manager has easy tools that make it the first Android junk cleaner anyone should try. Fire up the app and switch to the Clean tab at the bottom to access these options.


Here you'll see several areas that the app identifies as wasting space. These include Junk files, Duplicates, Backed up photos, and Unused apps. Select an option to look at what's taking up the most space, check what you want to remove, and confirm to have the app take care of the rest.


While you can also use the Browse tab to explore your phone's storage manually, letting the app weed out the biggest space hogs with these automated checks is more efficient.


As we'll see, a lot of the following apps have handy cleaning features but also cram in RAM optimizers and other nonsense you don't need. Google Files is a good answer to these; it's one of the best ways to clean Android with a simple, free app that isn't bloated with unnecessary extras.


Download:
Files by Google (Free)


2. Droid Optimizer


Droid Optimizer is one of the best-known Android cleaner tools, with over a million downloads on the Google Play Store. It's simple to use, especially for newbies, with an introduction screen that walks you through permissions and features.


It offers a "ranking system" designed to motivate you to keep your device in tip-top shape. If you don't mind having your own device shame you into better habits, Droid Optimizer is one of the best Android cleaner apps for you.


One tap is all you need to begin a phone cleanup. You'll see your stats at the top of the screen; free space and RAM show next to your "rank" score, where you receive points for your cleanup actions.


If you'd prefer to set and forget, Droid Optimizer allows you to set up regular, automated cleaning. This auto-cleanup will clean your cache, stop background apps, and delete any unnecessary files. It also comes with a "good night scheduler" to conserve energy, automatically disabling features like Wi-Fi when no connections are active.


Droid Optimizer can also mass-delete apps—useful if you're looking to quickly make some space.


It's not the most attractive app, but it works. If you're looking for a good Android phone cleaner and don't want to do much of the work yourself, Droid Optimizer should be on your shortlist.


Download:
Droid Optimizer (Free, in-app purchases available)


3. CCleaner


The same well-known desktop app for reclaiming disk space is also available on Android. We've discussed why CCleaner isn't an essential app for Windows anymore, as it's gone downhill somewhat since Avast acquired the service. And while the Android app isn't perfect either, it's better than a lot of the other spammy cleaner apps for Android.


Indeed, CCleaner on Android is a multifunctional app that does its best to analyze and clean up stray files taking up your precious space. The main function is the cleaner feature that can wipe cache data from apps, purge empty folders, and delete various histories.


It also has an App Manager, which offers a simple interface that lets you pick multiple apps for uninstallation. Lastly, the System Info page monitors your phone's resources (CPU, RAM, device details) so you can see what's going on at a quick glance.


No root is necessary and it's free, although you can upgrade to the Pro subscription for a few extras. It may be a bit light on features, but it does the job if all you need is a quick way to reclaim your phone's storage space.


Download:
CCleaner (Free, subscription available)


Cleaning your phone of unnecessary files is only one part of the maintenance task. What about monitoring your battery health, your CPU temperature, and those pesky mobile ads? The appropriately named All-In-One Toolbox is here to do it all.


It's capable of cleaning temporary files on your Android device, wiping your cache, and deleting empty folders and orphaned files. It just takes one tap to analyze your device, then another tap to delete, and you're done. It's a similar process with other areas of the app too.


The Boost function cleans your system cache and closes background apps, again with two taps. You can set this automatically with the Boost+ function if you'd prefer, but doing so requires an in-app purchase. If you're running out of juice, the Battery Saver section is another background task killer (see below for a warning on this), but it also provides your current battery statistics.


If that wasn't enough, there's also a mass app deleter, advanced file cleaning tools, and Wi-Fi analysis. As its name promises, All-In-One Toolbox tries to do it all. Like Droid Optimizer, there's also a ranking system to encourage regular use.


Download:
All-in-One Toolbox (Free, in-app purchases available)


5. SD Maid


SD Maid claims to be "at your service" as the digital cleaner for your Android phone. It keeps the experience simple; opening up the app gives you several quick actions you can use to "tidy up" your device.


The first, CorpseFinder, searches for and erases any orphaned files or folders left over from deleting an app. SystemCleaner is another search-and-delete tool, this time looking for common files and folders that SD Maid believes it can safely delete.


If you like the sound of this, AppCleaner performs the same action for your apps. To use this feature, however, you'll need to upgrade SD Maid Pro. There's also a Databases area to help optimize any app databases in use. In our test, it cleared 40MB from Spotify this way.


There are also tools for storage analysis (to help you find and delete big files) and mass app removal if you're considering a bigger phone tune-up.


Download:
SD Maid (Free, in-app purchases available) | SD Maid Pro ($4)


6. Norton Clean


Aside from CCleaner (owned by Avast), none of these cleaner apps come from top-tier security firms. The search for the best cleaning app for Android thus can't conclude without mentioning Norton Clean, offered by the famous Norton Antivirus from Symantec.


Norton claims to "remove the clutter" from your Android device. Much like the other entries, it'll search for and wipe your cache, remove any junk files, and help you quickly remove any unused apps you have installed. The Manage Apps section lists all your apps, letting you sort them by last use, installation date, or how much storage it uses.


The app takes a simple approach. Compared to the other entries, Norton Clean has one of the cleanest, brightest, and most modern-looking user interfaces. Everything you need is one or two taps away, meaning you don't have to be an Android pro to figure it out.


This one is also light on features—it's only a file cleaner and app deleter, with prominent ads for other Norton apps. If you're worried about space, however, Norton Clean is an easy enough way to help you reclaim it. And it doesn't have any in-app purchases or subscriptions to worry about.


Download:
Norton Clean (Free)


A Warning on Android Task Killers


A lot of cleaner apps for Android offer RAM boosting and task killing as a feature—even some on this list, like CCleaner. However, these are counterproductive, as task killers actually harm your device performance.


On Android, full RAM usage is not necessarily a problem. In fact, Android purposely keeps its RAM usage high to maximize performance. The Android OS is smart enough to know how to juggle open apps for optimal performance. Interfering with that process can cause Android to work harder than it needs to, which ultimately slows down your device—especially if you're closing background system apps.


Most modern Android apps shouldn't impact your battery performance that much either. If they do, Android should alert you to the problem (assuming you have a modern device). You might need to look at how to extend your Android battery life if that's the case. You can do that by limiting background usage using Android itself, not with a task killer or apps with task-killing features.


These apps are useful for removing old files and wiping cache data, but you should be wary about letting them control apps or services running on your device. The Android landscape has moved past these "all in one" optimization solutions. Devices are faster and Android is better at managing system resources.


To learn more, see what actually makes Android run faster and why you shouldn't constantly close Android apps on your phone.


Use Android Phone Cleaners With Care


Regular maintenance isn't vital for most Android users, but it can help to keep your device running smoothly in some cases.


That's the truth: your device will keep running even if you don't spend time clearing out junk. Most modern Android devices have plenty of RAM and device storage to cope with anything you have installed or saved. You shouldn't need to spend your days clearing app cache, either.


That said, if you notice there's a problem with your Android device, an Android cleaner could perk it up a little. If that doesn't work, you might need to try manual cleaning next.


Readmore : The top Android applications of 2022


Source: www.makeuseof.com

Search This Blog

Menu Halaman Statis

close